Wednesday, August 19, 2009

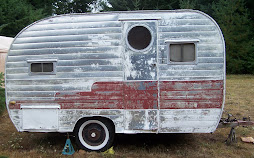
The skin is finally back on!


I really really wanted to keep the original skin. I love the vintage, shabby look. I would not at all like new shiny panels. This task took the longest and was by far the most difficult so far. I'm convinced the original trailer was not perfectly squared up. It is now, believe me I've checked it 20 times. I left the skin laying and did not change the edge crimp at all, yet the top and front and back panels would not line up at the end. I ended up having to flatten out the panels and recrimp the edges. It was like rolling up a nylon sleeping bag. You start at one side and by the time you are near the end it is all wacked out.

View through front window


Here is the view through the front window. I have a ton to do still but it is nice to have the windows routed out. I waited to route the windows until the skin was back on; just in case the windows and door did not line up.

Friday, August 7, 2009

Lots of work ahead


More than I expected but no biggie. I kept all the peices and layed them out to make as exact copies as possible so I would have no surprises when I go to put the windows and siding on.

floor board repair

Several spots near the back and the entry needed the floor to be replaced. I used the same materials 2x2 pine. It lasted 55+ years so it will give the grandkids something to do. I should leave a note under the floor like a time capsule.

Here it shows what a huge mess I'm making. I'm picking up more than repairing. Everthing just keeps getting layers and layers deeper. Everyday this last week has been over 100 degrees.

I decided to make the repairs to the frame without removing the walls completely. It was easy enough to remove any piece I needed to. I added several more frame pieces for the paneling to adhere to later.

Thursday, July 23, 2009

This video shows this weeks progress

Like all worthy projects, this one just keeps getting layers and layers deeper. The things I learned this week that I should pass on to those of you taking on a project like this:

Buy a small neumatic cutter (grinder) - It will save you hours trying to fight screws that are full of paint or rusted over. Cut right down the middle of the head of the screws and use a fat flat screwdriver to back them out.

Figure how much time each section of your project will take and write it down. Now throw it out, it is useless. So many things will unexpectedly show up that need doing. You will have to decide what level of repair you want to achieve and it always seems to end up " Well you've gone this far, why not do it right". Which translates into - trips to the hardware store, more planning and usually several new projects.

Next, the top step of the ladder is "not a step" - believe it.

Save all the material you are removing and label it. That will help you when you are fabricating the new pieces. I don't know how many times I have looked at a piece of wood and wondered where that came from.

Mark all the pieces that fit together. For example: draw an x that covers all the sections of a multiple junction before you separate them so you will know how they go back together later.

Use a lawn chair. This is critical. You must sit and think through the steps ahead of time. You don't want to make things harder than they have to be.

Get current on your tetanus shots.